Note: This is a guest post written by Greg Bucksin

Part One: Introduction, Dual-booting, and Installation
We’ve seen hype and marketing, we’ve seen Developer Preview builds, but the Consumer Preview of Windows 8 is finally available.
What’s Windows 8? Well, it’s either a unique device-agnostic OS that will place Microsoft squarely back on the short list of 21st Century tech companies, or a clumsy and desperate denial of Redmond’s irrevocable slide towards irrelevancy. Which side of the argument you fall upon will largely depend on whether or not you’re an Apple fan and/or a smartphone fan.
Certainly, Windows (in one form or another) is still the operating system of choice for nearly 80% of all users, and over 92% of desktop users (read more here). But Microsoft knows all too well that the “Post-PC era” is bearing down upon us all, and that consumers and enterprise customers alike are enthusiastically replacing their desk-bound habits with mobile devices and web apps. And the company also knows that Windows Phone, despite its many virtues, needs a huge push to gain any traction against Apple and Android’s near-duopoly of the market.
Plus, Microsoft historically gets it wrong every other time; after getting it right with both Windows 7 and Windows Phone, they’re due for a disaster trying to combine the two into Windows 8.
Does the Windows 8 Consumer Preview provide the best of both worlds, or just a pair of mismatched bedfellows? To answer this, I’ll put W8CP to the test from beginning to end — from system requirements to a full-fledged examination of the UI and apps. If you’ve been hesitating about taking the Consumer Preview plunge yourself, I humbly hope to show you that it can be done by mere mortals — hopefully, without destroying your desktop PC in the process.
Step One: The Requirements

- 1 GHz or faster processor — OK, I’ve got 3.07 GHz. Not to brag or anything.
- 1 GB RAM (32-bit) or 2 GB RAM (64-bit) — 6 GB here. 3 x the 64-bit minimum.
BTW: if you’re wondering whether you have a 32-bit or 64-bit system: click START, right-click on Computer, and select “Properties.” About halfway down, you’ll see “System Type:” followed by the answer to your question.
- 16 GB available hard disk space (32-bit) or 20 GB (64-bit) — at first, I wanted to test out how well Windows 8 utilized my solid state drive, but alas I have a mere 64GB SSD (and I want to keep my existing Windows 7 install — see below)
After removing some essential system software (namely, Batman: Arkham Asylum and Left4Dead 2), I had approximately 25.6GB free, which is over 5GB more than recommended. But I really prefer to leave a little more wiggle room for my OS. So I guess I’ll skip the SSD test and simply install it in a partition on my HDD — luckily, it’s 6 Gb/s SATA, so I shouldn’t be too limited.
- DirectX 9 graphics device with WDDM 1.0 or higher driver — ours go to (DirectX) 11, with WDDM 1.1. No worries there.
There are probably a dozen ways to check your DirectX version, but I simply clicked START ? RUN ? and typed “dxdiag.”
- 1024 x 768 minimum screen resolution (“In order to use the Snap feature, you will need a PC with a 1366×768 resolution or higher.”) — I keep my main PC connected to the living room HDTV, and I set my desktop resolution at 1280 x 720 for maximum readability.
I can certainly increase my resolution (I typically game with at least 1920 x 1200), but this made me wonder — why such specific resolution requirements for a supposedly scalable, device-agnostic OS? 1024 x 600 is a common resolution for 7” tablets, and PC users alone have a wide range of displays to work with. I’m probably just thinking too much.
Step Two: The Warnings

“Windows 8 Consumer Preview” is a rather innocuous name — perhaps Microsoft thinks that some people might be intimidated by “Windows 8: Half-Finished Total Operating System Replacement, Use at Your Own Risk!”
The FAQ section is littered with little confidence-boosting statements such as “your PC could crash and you could lose important files” and “we don’t offer technical support for prerelease software.” The message should be clear enough — don’t install W8CP unless you’re a PC god with high levels of patience and tolerance. I happen to be all of this and more, so no worries there.
Seriously, though — don’t even think about installing W8CP unless you’ve backed up your data, and are prepared to re-install your previous operating system from scratch (make sure you haven’t lost those original install DVDs, for example).
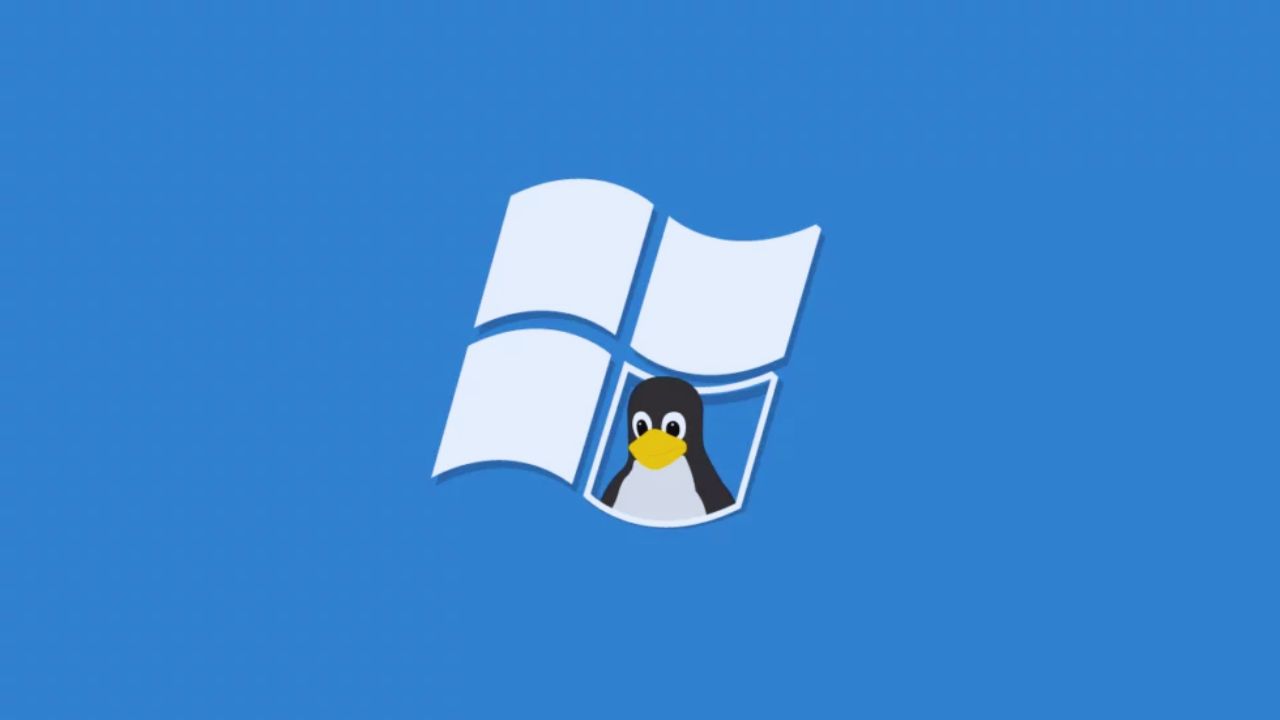
I decided to take the road less traveled (or the bet more hedged, as the case may be). A dual boot solution will allow me to truly ‘preview’ Windows 8, AND keep Windows 7, and simply choose between the two whenever I boot up my PC.
This method requires things like disk image files and partitioning drives — but if you’re not comfortable with that level of use, you may not be cut out for a beta build such as W8CP in the first place.
Step Three: Getting It

- You’ll get the Windows 8 Consumer Preview files directly from the Microsoft site. At only 5MB, the setup file should download in no time, depending on your connection, but the actual install files are a bit bigger — 1.5GB for 32-bit version, 1.9GB for the 64-bit version — so don’t attempt this on a lunch break, unless you have serious fiber to work with.
- Alternately, you can download the whole package (setup and files) as a single ISO image to be burned to a DVD or bootable USB flash drive. This comes out to 2.5 GB for the 32-bit version, and 3.3 GB for the 64-bit version, which will fit on a standard DVD.
It would have been nice for everyone (including Microsoft’s servers) if they’d made these files available as torrents (no really, P2P is NOT inherently illegal!). If you want to go that route, there are W8CP torrent files and magnet links out there.
The DVD or USB boot media can be used for a regular ‘upgrade’ install as well as the dual-boot install that I’ll be doing. Make sure you copy down the appropriate product key — if you’re getting the English version, it’s DNJXJ-7XBW8-2378T-X22TX-BKG7J
If you’re installing directly from the setup program, feel free to skip ahead to Step Four. My dual-boot install will take a few extra steps before I’m caught up to you.
Step 3a: Partitioning
While I waited for the ISO file to come down the tubes, I took the opportunity to create a partition. As I mentioned, the SSD acting as my C drive simply wasn’t going to provide enough safe room. The silver lining is that my D drive has the free space to give Windows 8 a full 32GB partition all to itself, which should be more than enough.
NOTE: Before we begin, I should caution you that I’ll be using the Shrink Volume command that comes with Windows 7. If you’re following along at home, be sure to back up any files on your drive before getting started. And you may want (or need) to consider using one of the more flexible (and potentially safer) disk partitioning tools available.
1. I begin by clicking START ? Administrative Tools ? Computer Management ? Disk Management
2. I then right-click on my D drive, and select “Shrink Volume.” Windows does it’s “Querying” thing for a few seconds, and then gives me the total amount that I can “shrink” (in other words, the amount of drive space that I can free up for a new partition). I don’t need anywhere near as much as it shows, so I’ll replace this value — but first I have to convert 32GB into Megabytes.
IMPORTANT: all else being equal, a “giga” should be 1000 “megas.” However, 1GB equals 1024MB in computer land, so 32GB = 32768MB. It’s probably not THAT important for a Shrink Volume to be byte-specific, but then again it may be. And I like to be tidy, anyway.
3. Yay! I now have 32GB unallocated. I’ll go ahead and right-click on the new partition, select “New Simple Volume,” and this conjures up the New Simple Volume Wizard.
4. I then click on “Next” a few more times, because I won’t need to change anything until I get the chance to name my new volume. I could leave it as “New Volume,” but as I said, I like to be tidy. So we’ll call it “Windows 8.”
5. With one more click, the Wizard goes to work and finishes before I’m even done writing this sentence. My newly created partition becomes my G drive (E and F were already spoken for), and it’s named “Windows 8.” So far, so good.
Hmm, the ISO is still downloading. I guess that says something good about the ease of partitioning in Windows 7, but maybe not so much about my DSL provider’s bandwidth. Oh well, see you after lunch.
Step 3b: Mounting the ISO

1. Choose your weapon: DVD or USB drive. Either one will work just fine, as long as you can boot from it. I’m burning to disc, simply because I don’t happen to have a spare USB drive with around 4GB of free space.
2. I use ImgBurn for my ISO needs, but Microsoft has its own multipurpose DVD/USB Download Tool that will do the trick nicely. There are many other app choices; feel free to use whatever you’re most comfortable with.
3. For me, as soon as I load up the blank DVD, the Windows 7 AutoPlay is helpful enough to give me the option to “Burn an Image using ImgBurn.” All I have to do is click on the folder icon and point it toward the “Windows8-ConsumerPreview-64bit-English.iso” file in my Downloads folder.
4. ImgBurn does its magic and verifies that the process worked. Hooray, a bootable disc.
5. Tricky part: you’ll need to restart your PC and go into the BIOS / EFI screen. This is usually done by pressing F2 (or sometimes F1, or even ESC, F8, F10). If your system boots as quickly as mine, it may take you a few tries. But come to think of it, if you can’t get into your BIOS, you probably shouldn’t be dual-booting beta versions of operating systems.
6. Find the section in your BIOS / EFI that controls ‘boot device sequence’ and put your DVD or USB drive first in the boot order.
7. Save your BIOS changes and restart your PC.
Step 4: Installing it
- Whether you run the setup program or boot from the ISO media, the first thing that you’ll notice is the “Let’s see what’s compatible” window. After scanning for a few seconds, this will switch to “Here’s what we found.” Well well, isn’t Microsoft all friendly and conversational these days?
This notification is simply a selection of hardware and software issues. Click on the expanded list for more info, but don’t be too concerned — especially if you’ve backed up everything and/or you’re installing to a new partition. You’ll probably have to re-install several apps and/or drivers, and it’s possible that some of your apps and devices just won’t work. But it’s just as possible that Microsoft is being overly cautious; chances are most of the problematic apps and devices will end up working just fine.
- Once you’ve fretted over this to your content, click “Next” to get to the “Getting a few things ready” window. If you’re installing from the setup program, it will fetch a product key for you and then you’ll start the file download. If you’re using the ISO, you can simply use the product key from the download page (you DID write it down, didn’t you?).
- You’ll encounter the dreaded EULA, and then you’ll be asked if you want an “Upgrade” install (allegedly preserving files, settings, and apps) or a “Custom” install (which is what I’ll be doing, to get a totally fresh and separate Windows 8 installation).
- Now for the install process itself. Get comfortable; it took me just about a half-hour, and my PC restarted a few times. I knew there was progress, because I got a choice between booting into Windows 7 and Windows 8. While I agonized over whether to actually click one or the other, it restarted again — twice. I resolved to leave it alone, which turned out to be the right choice.
- If you see an ‘installation progress’ dialog, or a fish blowing bubbles, all is well. If you see a blank screen (or even worse, a BSOD) for more than a minute or so at a time, your install has probably failed.
- The restarting cycle ends when you see the “Personalize” screen asking for your choice of background colors. This means a successful install of Windows 8 Consumer Preview, whew!
- But before we get to the good stuff, you’ll be asked to enter some wireless details and other basic settings, and to sign in with your Windows Live credentials. Next stop, Metro UI.
In Part Two, I’ll go deeper into the Windows 8 experience, and see exactly what it does for the desktop user. Expect to read far less about things like partitioning and dual-booting, and far more about things like the Metro UI, Internet Explorer 10, the App Store, and more!
Note: This guest post was written by Greg Buckskin at CableTV.com where he is a writer and internet marketer.
Comments are closed.