
I’ve been searching for the “perfect” WordPress backup plug-in and I’ve probably tried around 4-6 plug-ins that I found out there. I wasn’t happy with them so far. Sometimes a plug-in can only backup the WordPress database, another gave me a PHP time out because this blog is on a shared hosting (assigned a limited memory resource), and so on. Today, I found the ultimate or best WordPress backup plug-in (at least for now), called XCloner. It’s free, powerful, easy (once set-up correctly), and works!
XCloner is free to download and use, although you can pay a premium price for support (but who needs one? :)).
You can do a plug-in search for XCloner through your WordPress administration control panel (Add new plug-ins), install, and activate it from there.
Why I like XCloner
- Free
- Can backup both WordPress database and files
- Can choose to either backup the database or the files
- Can even exclude certain tables and folders to backup (if you don’t need to backup the WordPress core folders, for example)
- Backup files are stored locally on your server, not being stored on a third party server
- There is an option to move the backup files somewhere else if you want to, through an FTP server (great when you want to move to a different web hosting provider – although HostGator will do a migrate for free)
- You an also store the backup files to Amazon S3 Storage if you have one
- You can set-up a cron job (schedule an automatic backup of files only, database only, or both)
- You can restore through the same plug-in (althoughI haven’t tested this yet) BUT:
- Backup files are just a tar/zip of your whole WordPress blog folders (you can simply upload the whole files manually if you have problems with the restore function) and a plain SQL dump (you can import it to your database manually via PHPMyAdmin or your webhosting support)
Interested? So do I and I’ve decided to pick XCloner as my primary backup plug-in for Craving Tech :)
How to backup your WordPress blog with XCloner plug-in
(1) Search, install, and activate XCloner plug-in
(2) Go to XCloner’s menu through Plugins->XCloner
You should see the initial screen here with a bunch of red warnings (because you need to do some basic set-ups first):
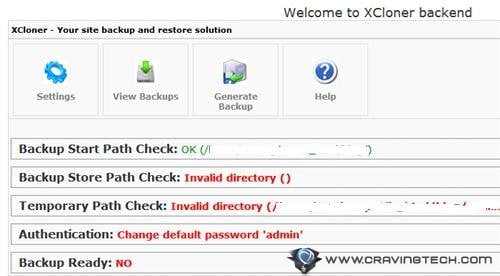
Before we get the “Backup Ready”‘s green light, we need to solve the 3 other problems first. So go to Settings to fix these up.
(3) Create and assign a backup folder (“Backup Store Path Check”) where the backup files are going to be stored.
You can do this through FTP or the File Manager on your webhost’s cPanel. Create a new folder and add it to XCloner.
(4) Create a folder named “administrator/backups” as asked by XCloner. This will be used to store temporary files during the backup process and to store the database backup files.
This folder needs to be created under your WordPress root folder (such as wordpress/administrator/backups or another if you named it differently upon installing WordPress).
(5) Change your XCloner’s administrator password through XCloner settings-Authentication
(6) Go back to XCloner’s Home screen and you should have green lights all over:
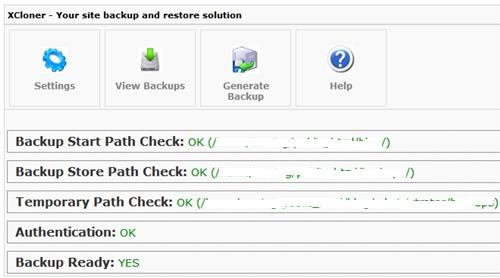
(7) To backup your WordPress blog, click on the “Generate Backup”
It should bring you to a sub-menu where you can include/exclude files and database to be backed up.
(8) Leave the Database setting as it is to backup your whole WordPress database. The “Backup Database” button should be green – indicating that you want to backup the WordPress database. Click on it if you don’t want to backup the database.
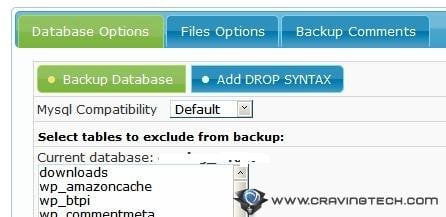
(9) Go to the “Files Option” tab to include/exclude folders
If you just want to backup your blog’s database, tick all folders (use the “check all”) to exclude them. If you just want to include your blog’s theme + plug-ins + images on your posts, just include the wp-contents folder and you’re set.
IMPORTANT: If you are backing up the database, please make sure that the “administrator” folder you created earlier is INCLUDED. The database SQL dump file will be located here so if you exclude the “administrator/backup” folder, the database file will not be included later on by XCloner.
(10) All good to go, just click on the CONTINUE button to start the backup process
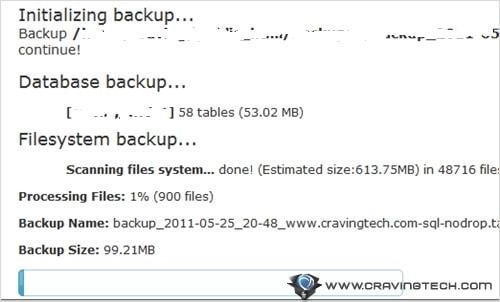
Depending on how big your blog is, this process may take a while. As you can see above, this blog has around 48,716 files in total (613 MB in size)! Where as my other blog, Write for God only has 4035 files with 87.23 MB in size.
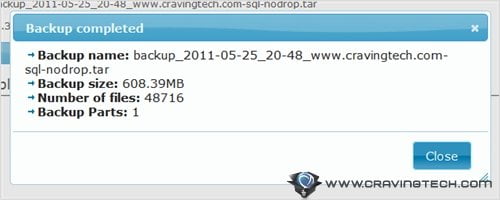
XCloner didn’t even time-out with such a huge process, making XCloner suitable to backup big blogs. XCloner claims to run incremental processes so backing up big blogs will never time-out on the server (by separating them in chunks but we do not need to worry about this, the back-end handles it automatically). When I tried another WordPress backup plug-in called EZPZ One Click Backup, it timed out at Craving Tech due to the memory limitation, although it worked fine on my other blog.
What I like the most is that the backup files are stored plainly (as if you are just downloading the whole folders through an FTP):
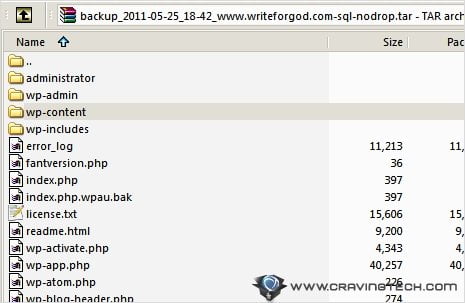
Even the database backup is stored in a plain SQL file – meaning you can import and restore your database without having to use XCloner in the future. You can import the SQL file manually to restore your blog’s database. However, XCloner has a restore function to make things easier for you.
At this stage, I think XCloner is the best WordPress backup plug-in out there. The initial set-up may take a while (having to create and assign a couple of folders) but you only have to do it once. At the end, XCloner is powerful and works for handling large files and database comfortably. Feel free to browse the other features such as setting up a backup schedule and a few others that I haven’t covered in this post yet.
If you think you have a better backup plug-in, let us know and tell us why :)




Comments are closed.