D-Link VIPER (2900AL) and the older D-Link 2890AL are great modem routers (make sure to check Craving Tech’s reviews if you haven’t yet). They are also quite popular among D-Link fans so I thought of compiling some tweaks to a post for myself and D-Link router owners out there. It should also work with other D-Link routers with the new modern interface.
How to make Netflix works through Chromecast (direct stream) by blocking Google’s DNS (i.e 8.8.8.8. and 8.8.4.4) with a D-Link VIPER (or D-Link 2890AL) router
Your Google Chromecast is hard-coded to use Google DNS, which means that if you are using a VPN or own DNS to bypass the Netflix country restrictions, you will be prompted with the error message that “Netflix is not available in this part of the world, etc”. You have to do a static route on your router as a fix.
On D-Link VIPER – Static Routes screen, there is no “LAN” option (only “WAN”) and the workaround I found didn’t work. Thankfully, there is another way to do this, thanks to a D-Link representative on the Whirlpool forum. Here are the steps:
[1] Go to your router’s IP address with your web browser
[2] Go to Features – Firewall – IPv4 Rules
[3] Make sure this is the set option: “Turn IPv4 Filtering ON and DENY rules listed” and then click on the Add Rule button to add a new rule.
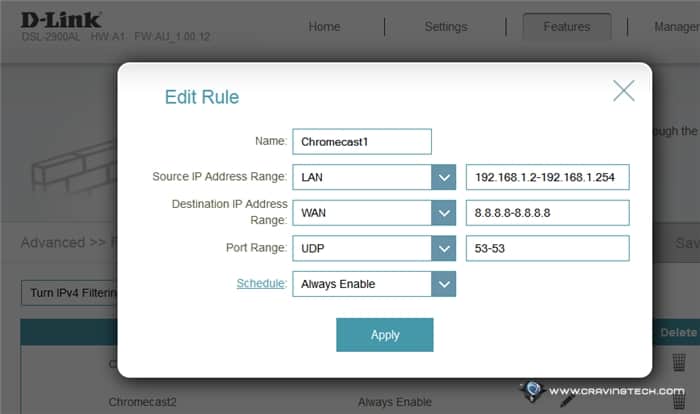
[4] Add a new Rule:
Name: (Anything you like)
Source IP Address Range: Select LAN and enter: 192.168.1.2-192.168.1.254
Destination IP Address Range: Select WAN and enter: 8.8.8.8-8.8.8.8
Port Range: UDP 53-53
Click Apply.
[5] Add another Rule:
Name: (Anything you like)
Source IP Address Range: Select LAN and enter: 192.168.1.2-192.168.1.254
Destination IP Address Range: Select WAN and enter: 8.8.4.4-8.8.4.4
Port Range: UDP 53-53
[6] Save
That’s it. Netflix should now work (Note: Don’t forget to add your VPN DNS like UnoTelly’s DNS to your router’s Primary and Secondary DNS settings).
Source: Whirlpool thread
How to set up D-Link VIPER with Huawei’s modem router from TPG FTTB (Fiber-To-The-Building)
[1] Go to the Huawei’s interface with a web browser
[2] Create a bridge for the Internet WAN by going to: Basic – WAN
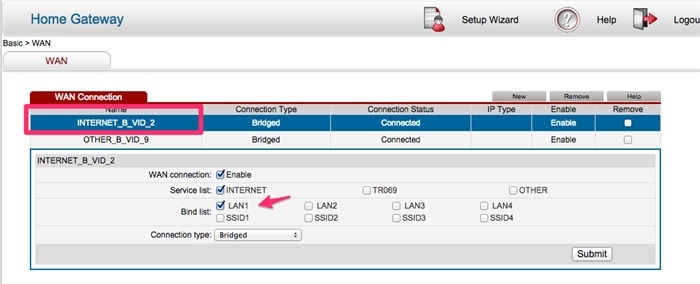
If you have “INTERNET_R_VID_2” and not “B”, that’s okay, it’s the same thing.
Tick on “LAN1” and change the Connection type to “Bridged”. Press Submit to save.
[3] Disable the wireless network as you will be using your router to manage everything and just want the Huawei modem router to just connect to your FTTB. This can be done by going to Basic-WLAN-WLAN and untick the enable WLAN.
WARNING: You will lose connection to the router via Wi-Fi after saving this. If all else fails, you can always do a hardware reset (I did it once) and starts over.
[4] Hook the network cable from LAN1 on your Huawei modem router to LAN4 (Port 4) on your D-Link Viper modem router. It must be hooked to Port 4 (I spent hours trying to figure out why it didn’t work because I plugged it to the Gigabit Ethernet Port 1).
[5] Go to your D-Link Viper interface
[6] Go to Settings-Internet and select “Residential Gateway (NBN/UFB Mode)”.
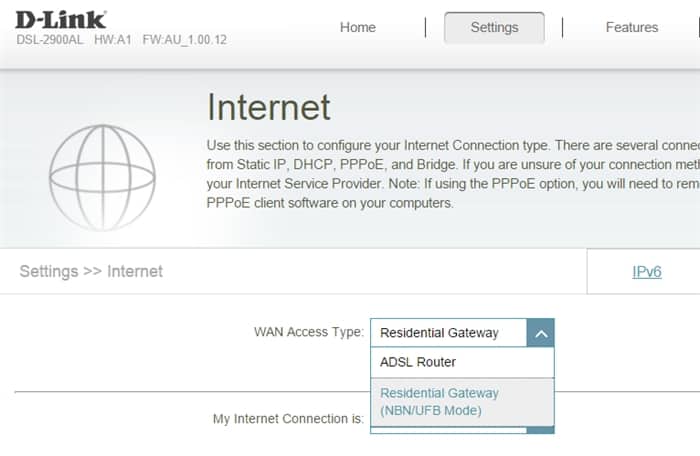
Pick “PPPoE” on “My Internet Connection is” and put in your TPG FTTB username and password.
Save and enjoy!
Source: Whirlpool thread