How to do Mail Merge in Gmail – Mail Merge, is the process of merging data with your email; creating a personalised email that you can use for marketing or in my case, sending license keys to giveaway winners easily.
Rather than composing an email one by one and making changes to the recipient email address and the license key, there is an easier and cooler way. You can also use this for any other purpose and you don’t need a Microsoft Word or Microsoft Outlook installed.
The process pretty much combines your Gmail draft with a Google Docs spreadsheet (with the fields that you want to merge in your email such as the name of the recipient, and other information).
Step by step instructions:
1) In Gmail, compose a new email that you plan to send to multiple recipients and save it as a draft (just close the compose box/window and Gmail will auto-save it as a draft)
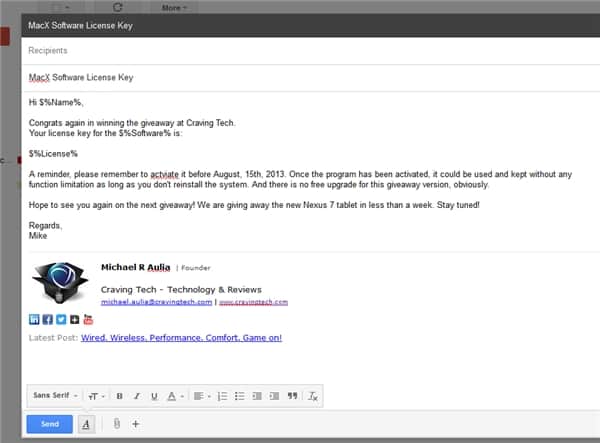
2) Use $%FIELDNAME% which will be replaced later on by the mail merge process. It will automatically find the correct matching field name on the Google Docs table that you will create soon.
So for example: “Dear $%Name%”, etc.
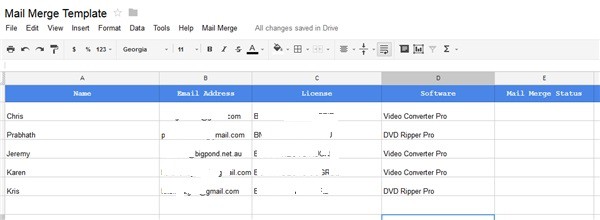
Google Docs
1) Use this Labnol.org’s mail merge template in Google Docs by making a copy of it and saving it into your own Google Docs account.
2) Feel free to change the field names or add/remove columns as you see fit. Just make sure to keep the “Email Address” field in tact and also the “Mail Merge Status”. Make sure the field names are the same as the ones you declare in your Gmail’s draft (don’t use spaces if you don’t want to make mistakes in typing).
The email address field will contain the recipients’ email addresses. The “Mail Merge Status” field will be auto-populated once you’ve run the mail merge process (just empty the rows every time you run a new mail merge).
3) Once you are happy (PLEASE DOUBLE CHECK EVERYTHING! You don’t want to send the wrong emails to the wrong recipients), click on the “Mail Merge” menu, next to the Help link.
4) If this is the first time you are doing this mail merge, you will be required to authorise Google Docs to be able to send emails. Once you’ve authorised it, click on the Mail Merge again to start the process.
5) You will be presented with a new pop-up. Select the Gmail draft you created earlier to be used in this mail merge process. You also need to enter the sender’s name (you).
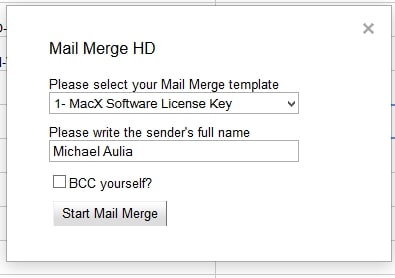
6) Click on the “Start Mail Merge” to start the process where the magic happens.
Google will auto-fill the status of the mail merge on the “Mail Merge Status” field. If all is well, you should get an “EMAIL_SENT” status:
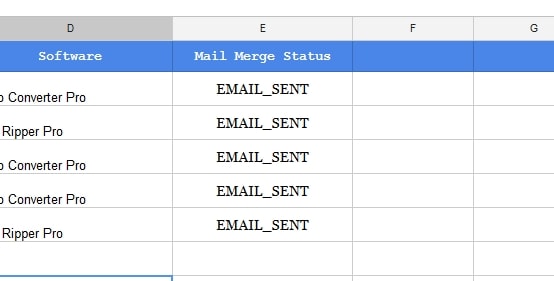
If you need to re-do it again, Google will automatically skip the rows that already have the “EMAIL_SENT” status. Empty the rows if you want the emails to be sent to the whole list again.
Note that there is a limit of 500 emails that you can send via mail merge per day.
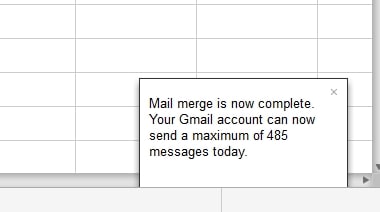
As long as you don’t go crazy, you will be fine!
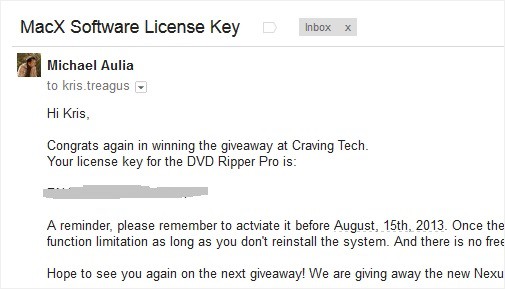
I actually ticked on the “BCC yourself?” on the pop-up option just to confirm that everything was sent correctly (optional). As you can see from the BCC email in my Gmail inbox, the values in the fields I specified were replaced correctly:
Hope this guide helps you out! Please share this post if you like it and help the others.
Source: Labnol